Materialen voor het maken van stempels of prints

Materialen voor het maken van stempels of prints

Wil je zelf stempels gaan maken? Tja, waar begin je dan? In de shop staat een berg materialen, maar wat gebruik je waarvoor? Elk materiaal heeft een eigenschap waardoor ze fijn zijn om te gebruiken. Zoals altijd: het blijft persoonlijk wat voor jou nu het fijnste werkt. Maar wat is het nu eigenlijk?

Hoe maak je zelf stempels?

Wat een vrij traditionele manier van prints maken leek, komt helemaal weer terug. Met een guts snij je de stukken weg die je niet op de print wil hebben. Wat je overhoudt, dat wordt dus de uiteindelijke print. Het is vrij lastig om een goede rechte snede te maken in een carving blok, dus daarom heb je ook zeker wat oefening nodig voordat je de mooiste prints maakt ;). Hoe je dat precies doet, leg ik in een andere blog uit: lees die hier. Hopelijk helpt deze blog je verder bij het kiezen van de juiste materialen.

Als je gaat beginnen met het maken van stempels heb je vier verschillende materialen nodig:
- Guts
- Guts blok oftewel carving blok
- Stempelkussen, inkt of verf
- Papier
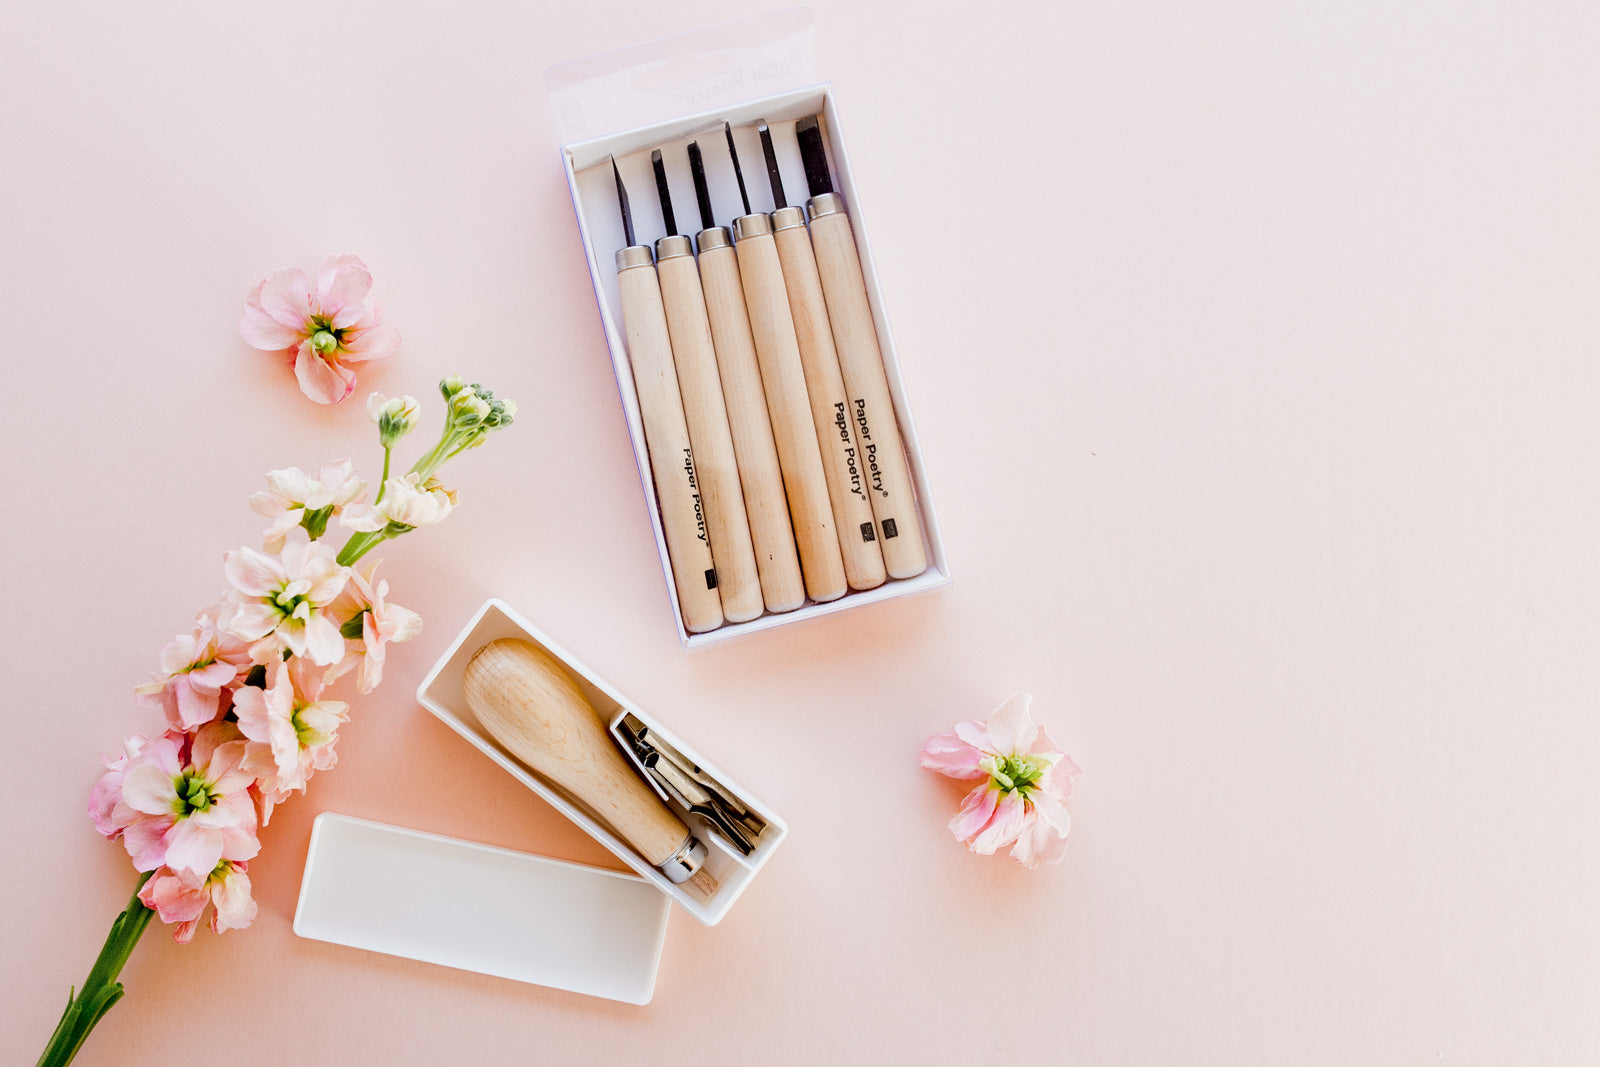
Dit zijn nog hele brede begrippen, maar tegelijkertijd ook de opbouw van deze blog. Per categorie leg ik je uit welke eigenschappen de materialen hebben. Maar als eerste: wat maak je eigenlijk met deze materialen?

Guts

Belangrijk bij een guts is dat deze fijn in de hand ligt. Bedenk daarbij hoe je de guts wil gaan gebruiken. Een guts gebruik je altijd in een snijdende beweging van je af. Daarom ligt het heft in je handpalm. Een rond heft is daarom comfortabel in gebruik.

Abig stempelguts

De Abig stempelguts set is de meest favoriete set om mee te gutsen. Het heft ligt fijn in de hand, door de ronde vorm hou je hem stevig in je handpalm vast en zet je makkelijk wat druk door de comfortabele vorm.

Rico stempelguts

De Rico gutsen set is vooral erg fijn omdat alle gutsen een eigen heft hebben. Je hoeft dus niet steeds elk mesje te wisselen in het heft. De grip is alsnog redelijk dik, waardoor je wel goede grip hebt op het heft tijdens het gutsen.

Mes

Een guts gebruik je uiteindelijk altijd om stukken weg te halen. Als extra hulpje kun je voor het gutsen ook eerst de randjes snijden met een vlijmscherp hobbymes. Zo maak je messcherpe kanten en prints. Dan kan je daarna de rest dus nog weg gutsen.

Guts blok

Het grootste verschil zit misschien wel in de carving blokken, ofwel gutsblokken. De ene persoon wil een heel stevig blok hebben om in te gutsen en iemand anders wil in een blok snijden alsof het een pakje boter is. Misschien gebruik je tot noch toe een gum. Gelukkig zijn er veel meer verschillende fijne opties, die het gutsen veel makkelijker voor je maken. Ik noem ze in volgorde van hard naar zacht.

Linoleum

Veruit de ‘taaiste’ optie is linoleum, dat is ook de meeste bekende optie onder velen. Misschien heb je dat ooit vroeger gebruikt voor een schoolopdracht. Dit materiaal wordt gebruikt door de liefhebbers door het stugge oppervlakte, waardoor je heel precies kunt werken. Het is bijna als het werken in hout, alleen gaat het dan ietsje makkelijker. De prints die zijn gemaakt met lino plakken, laten allemaal de structuur van het lino zien in de prints.

Voordelen
- Je kunt er heel precies mee werken
- Het is voordelig

Neutraal
- De structuur in de print. Uiteraard verschilt het per persoon wat je mooi vindt, daarom staat deze eigenschap als neutraal gemarkeerd

Nadelen
- De geur, linoleum ruikt vrij sterk
- Doordat linoleum erg stevig is, is er kans op uitschieten met je guts

Essdee Soft cut of easy cut

De Essdee SoftCut is wat zachter dan het Speedball Speedy-Carve en veert minder mee. Het materiaal is compact, brokkelt of breekt niet en is daarom heel geschikt voor precies werk. De ene kant is glad, de andere kant heeft een textuur. Door de witte kleur kun je er makkelijk op tekenen met potlood. De blokken zijn 3 mm dik.

Voordelen
- Pikt fijn inkt op

Nadelen
- Het materiaal is niet stevig genoeg om zo te gebruiken, dus ik raad je aan om het te verstevigen met een blokje hout of kunststof.

Factis Carving blokken

De Factis carving blokken zijn ideaal voor het maken van stempels en prints. Het buigzame vinyl is heel soepel, slechts 6 mm dik en je carvingmes glijdt er zo doorheen! Je kunt er hele precieze lijnen en details in maken. De Factis blokken zijn bijna hetzelfde als de Speedy Carve. Ik heb eigenlijk geen verschillen gevonden, op de kleur na.

Voordelen
- Goede prijs/kwaliteit verhouding
- Je hoeft ze niet te verstevigen
- Dubbelzijdig te gebruiken
- Bijna alle soorten inkt zijn te gebruiken
- Bevat geen latex, fosfaat en zware metalen​

Nadelen
- Niet bestendig tegen oplosmiddelen​

Speedy Carve by Speedball

De Speedy Carve blokken zijn gemaakt van flexibel rubber en hebben wat weg van een gum. Je glijdt er makkelijk doorheen met je carvingmes. Het materiaal is flexibel en breekt, brokkelt of scheurt niet. Deze blokken zijn ideaal om stempels te maken van foto’s, transfer images van inktjet printers etc. De blokken zijn 6 mm dik.

Voordelen
- Je hoeft ze niet te verstevigen
- Bevat geen latex

Nadelen
- De blokken zijn erg prijzig

Stempelkussens of inkt​

Versacolor of Versacraft

Deze twee stempelkussens noem ik in dezelfde categorie omdat er meestal wordt gevraagd wat het verschil tussen beide is. Zonder er een al te uitgebreide uitleg aan te wijden:

Waarom Versacolor:
- Beschikbaar in veel verschillende, heldere kleuren
- Fijn voor gebruik op papier

Waarom Versacraft:
- Watervast
- Te gebruiken op verschillende ondergronden zoals: hout, papier, textiel en leer

Acrylverf of inkt

Naast stempelkussens kan je natuurlijk ook andere materialen gebruiken voor het afdrukken van stempels en prints.

Inktrollers

Ga je grote prints maken? Dan zijn stempelkussens niet geschikt. Maar wat gebruik je dan? Zoals ik net al noemde kan je ook acryl gebruiken voor het printen met stempels. De acryl verf verspreid je met een inktroller over de stempel en vervolgens leg je het papier op de plaat neer. Dat druk je goed aan en daarna haal je het papier weer af van de printplaat. In de shop heb ik de maten 65 mm en 100 mm.

Papier

Voor mooie prints, heb je uiteindelijk goed papier nodig. Voor prints kan je het beste mooi glad papier gebruiken. Wat meestal erg mooi werkt is Bristol papier. Dit papier is super glad en meestal ook ongeveer 300grams waardoor je het meteen kunt gebruiken voor het ophangen tegen de muur :). Twee vliegen in 1 klap. Bristol papier is wat duurder papier, wil je liever eerst wat vaker oefenen? Dan is het Mixed media papier van Strathmore ook echt een aanrader! Dat is glad papier en goed geschikt voor verschillende soorten materialen.

Uiteraard zijn alle materialen die ik noemde in de blog te vinden in de shop. Alle items zijn gelinkt :).

Als er iets niet duidelijk is: please let me know! Ik help je graag!

Liefs,

Judith
[lang2]

Do you want to make your own stamps? Well, where do you start? The shop has a sea of materials, but what do you use for what? Each material has a property that makes them pleasant to use. As always: it remains personal what works best for you now. But what is it actually?

How do you make stamps yourself?

What seemed like a fairly traditional way of making prints, is coming back all the way. With a gouge you cut away the pieces that you do not want on the print. What you have left over will be the final print. It's quite difficult to make a good straight cut in a carving block, so you definitely need some practice before you make the best prints;). How you do that exactly, I'll explain in another blog: read it here. Hopefully this blog will help you in choosing the right materials.

When you start making stamps you will need four different materials:
- Gouge
- Gouge block or carving block
- Ink pad, ink or paint
- Paper


These are still very broad concepts, but at the same time also the structure of this blog. Per category I explain which properties the materials have. But first of all: what do you actually make with these materials?

Gouge

It is important with a gouge that it fits nicely in the hand. Think about how you want to use the gouge. You always use it in a cutting motion away from you. That's why the handle lies in your palm. A round handle is therefore comfortable to use.

Abig stamp gouge

The Abig stamp gouge set is the most favorite set for gouging. The handle fits nicely in the hand, thanks to the round shape you can hold it firmly in your palm and you can easily apply some pressure due to the comfortable shape.

Rico stamp gouge

The Rico gouge set is especially nice because all gouges have their own handle. So you don't have to keep changing every blade in the handle. The grip is still quite thick, so you have a good grip on the handle while gouging.

Knife

Ultimately, you always use a gouge to remove pieces. As an extra aid, you can also cut the edges with a razor-sharp hobby knife before gouging. This way you can make razor-sharp edges and prints. Then you can still gouge the rest away afterwards.

Gouge block

The biggest difference is perhaps in the carving blocks, or gouge blocks. One person wants to have a really sturdy block to gouge in and someone else wants to cut a block like a pack of butter. Maybe you have used an eraser until now. Fortunately, there are many more good options that make gouging much easier for you. I list them in order from hard to soft.

Linoleum

By far the "toughest" option is linoleum, which is also the best known option among many. Maybe you used that for a school assignment once before. This material is used by enthusiasts due to the stiff surface, which allows you to work very precisely. It is almost like working in wood, only it is a little easier. The prints that are made with lino paste, all show the structure of the lino in the prints.

Benefits
- You can work very precisely with it
- It's beneficial

Neutral
- The structure in the print. Obviously it differs per person what you like, which is why this property is marked as neutral

Cons
- The smell, linoleum smells quite strong
- Because linoleum is very sturdy, there is a risk of slipping with your gouge


Essdee Soft cut or easy cut

The Essdee SoftCut is somewhat softer than the Speedball Speedy-Carve and is less flexible. The material is compact, does not crumble or break and is therefore very suitable for precise work. One side is smooth, the other side is textured. The white color makes it easy to draw on it with a pencil. The blocks are 3 mm thick.

Benefits
- Grabs onto the ink nicely

Cons
- The material is not strong enough to use like this, so I recommend reinforcing it with a block of wood or plastic.

Factis Carving blocks

The Factis carving blocks are ideal for making stamps and prints. The flexible vinyl is very smooth, only 6mm thick and your carving knife will slide right through! You can make very precise lines and details in it. The Factis blocks are almost the same as the Speedy Carve. I actually didn't find any differences, except for the color.

Benefits
- Good price / quality ratio
- You don't have to reinforce them
- Can be used on both sides
- Almost all types of ink can be used
- Does not contain latex, phosphate and heavy metals

Cons
- Not resistant to solvents


Speedy Carve by Speedball

The Speedy Carve blocks are made of flexible rubber and look a bit like an eraser. You slide through it easily with your carving knife. The material is flexible and will not break, crumble or tear. These blocks are ideal for making stamps from photos, transfer images from inkjet printers, etc. The blocks are 6 mm thick.

Benefits
- You don't have to reinforce them
- Doesn't contain latex

Cons
- The blocks are very pricey

Stamp pads or ink

Versacolor or Versacraft

I mention these two ink pads in the same category because it is usually asked what the difference is between them. Without devoting too much of an explanation to it:

Why Versacolor:
- Available in many different bright colors
- Great for use on paper

Why Versacraft:
- Waterproof
- Can be used on different surfaces such as: wood, paper, textile and leather

Acrylic paint or ink

Besides stamp pads you can of course also use other materials for printing stamps and prints.

Ink rollers

Are you going to make large prints? Then stamp pads aren't suitable. But what do you use then? As I just mentioned, you can also use acrylic for printing with stamps. Spread the acrylic paint over the stamp with an ink roller and then place the paper on the plate. You press that down well and then you remove the paper from the printed circuit board. In the shop I have the sizes 65 mm and 100 mm.

Paper

For beautiful prints, you ultimately need good paper. For prints it is best to use nice smooth paper. What usually works very nicely is Bristol paper. This paper is super smooth and usually about 300grams so you can use it right away for hanging on the wall :). Kill two birds with one stone. Bristol paper is a bit more expensive paper, would you rather practice more often first? Then the Mixed media paper from Strathmore is highly recommended! That is smooth paper and well suited for different types of materials.

Of course all the materials I mentioned in the blog can be found in the shop. All items are linked :).

If something is unclear: please let me know! I would like to help you!

Love,
Judith


Trefwoorden:
Ouder bericht Terug naar Blog Nieuwer bericht
Over de auteur

Over de auteur

Judith, eigenaar Splendith

Elke keer al wilde ik iets moois maken, dan kon ik niet de goede materialen vinden. Avonden lang struinde ik online naar kwalitatieve en vrolijke knutselmaterialen voor mijn projecten.

Daar begon het idee voor een shop, met een selectie van mooie materialen.

Met de blog en materialen hoop ik je te inspireren om creatief aan de slag te gaan.

Lees meer over ons

Over Splendith

'Create the things you wish existed'

​Alleen maar kwalitatieve, blije en leuke materialen vind je bij Splendith! Bij ons vind je een selectie aan materialen die je ergens anders misschien niet zo snel ziet.

Ben je op zoek naar mooie DIY materialen? Dan ben je bij ons aan het juiste adres.