Good news, this is the start of a new blog series: Floral Friday! (Almost) every week a blog about flowers comes online on Friday! Not always about paper flowers, but just about nice ideas and, for example, the progress of my own flower garden. I can tell you that a new tutorial will be online every week for the next four weeks. All tutorials are available for free, just like the templates. You can then choose whether you buy the materials together in a DIY package, or whether you choose all the materials yourself. So great for the beginner, but also for the enthusiastic DIYer. Hopefully you're as excited about it as I am :).
I have already prepared and scheduled the tutorials for the coming weeks, haha I actually had to restrain myself from putting them all online at once. By the way, you can already shop them all at Paper Passion!
Requirements for a paper Dahlia:
Florist Crepe Paper:
Or just a DIY package to make it easy for you!


Step 1:
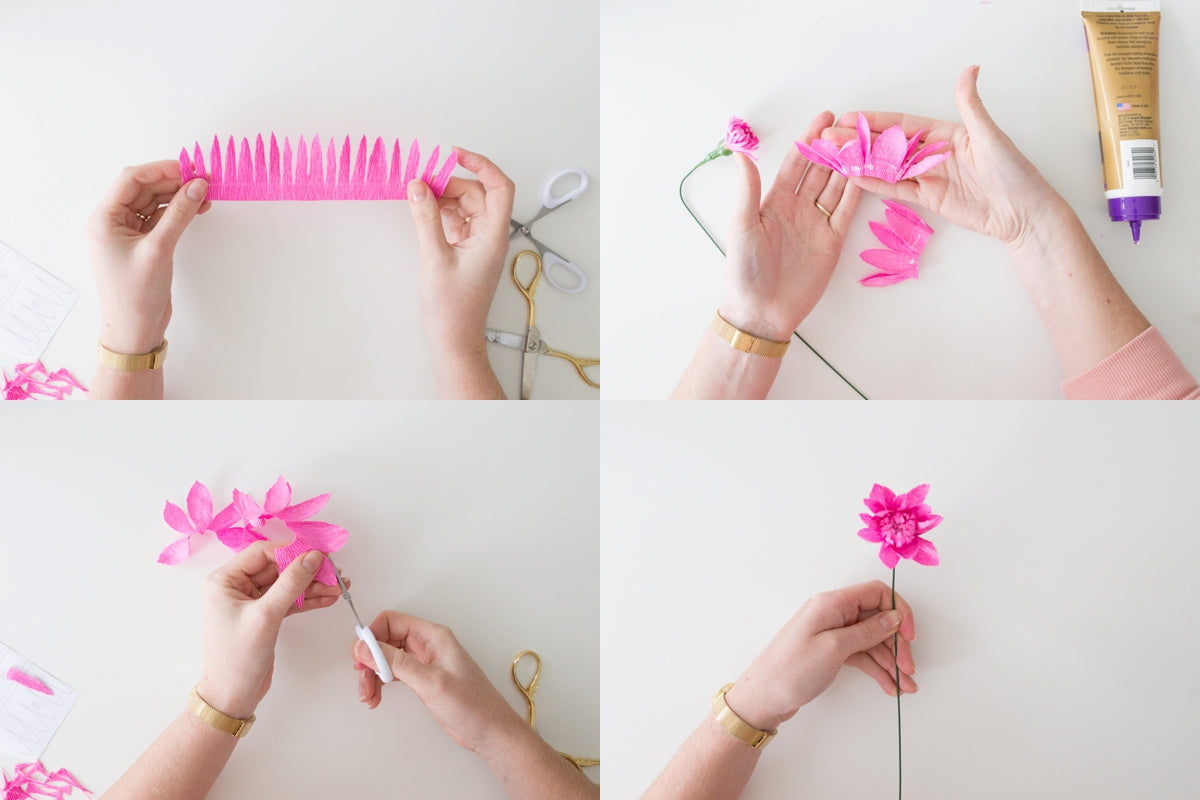
Cut a strip of unstretched paper of +/- 20cm with the height of template 1. You ALWAYS cut so that the stretch of the paper is in the width. Stretched out, the strip is approximately 40cm, which you can easily measure along the flower wire. Then you cut the corners out of the paper. Repeat this step so that you have two strips of 40cm. I find it easy to fold the strip in half so I can cut four layers at once. I then clamp the paper with clamps. I think you can also use paper clips for this. The edge under the points is now still 1cm. The template is deliberately a bit wider, which makes cutting easier. Once you have cut the fringes, I trim the bottom so that I am left with a 5mm strip. Then you cut off about 2mm from the points, so that they are less sharp.


Step 2:
With scissors I curl the fringes into a small curve. Apply glue to the strip at the bottom, but do not use too much so that the paper does not get too wet. I always use Tacky Glue (sometimes Turbo) from Aleene's. You make a small curve at the top of the flower wire (this has already been done with DIY packages) then you roll the paper very tightly around the flower wire. If it didn't work out well, start over immediately. It is really important that the center is properly secured. Otherwise you run the risk of your flower sliding off the wire at the end. After the first strip, wrap Parafilm around the paper and continue twisting up to 5cm on the flower wire. Do this again for the second strip.
Parafilm only works by stretching it. You stretch the Parafilm and by placing two stretched layers on top of each other, it shrinks. Super sturdy and handy! Before you put it on the wire, you can always test it on something else, for example a pen.

Step 3:
In this step you make the small leaves of the Dahlia. You cut template 2 from unstretched paper, with about 10-15 leaves. Then you shape the leaves, using your thumb you push the shape into the leaves. Then you can trim the leaves a little. You glue some leaves together at the bottom, you can see in the photo how I did this.
Now the fiddling is done ;). If all goes well, your flower should look something like the one below on the right.

 Step 4:
Then cut 10 x the square of template 3 and 25 x the square of template 4. The height is the most important, the width a little less. So you can easily cut a number of strips and then divide them into narrow pieces.
Use your thumb to push the shape into the leaves. Then you cut out the shape of the leaves. Keep the small and large leaves separated.


Step 5:
Now the flower will grow very quickly. Fold the small leaves inward at the bottom and attach them with the bottom against the core. You can see how in the photo above right.
A very important step for a good finish: stick the rest of the leaves to the bottom of the leaves that you are just attaching. So just a little bit, but preferably not on the flower wire/stem. Otherwise you will get a very large plug at the bottom, which cannot be removed neatly.


Step 6:
You cut template 5, stretch it a little so that you get a nice shape. You glue this in place. Then you finish the stem with a narrow strip of green paper. You apply a minimum amount of glue over the entire length. Twist the strip around the stem.
And tadaaa, YOU DID IT!
If you have any questions, please ask them in the comments!
Love,
Judith
