Yay, a new category: make your own stamps! The materials often trickle into the shop one by one, but this time everything is online at once. I have searched for the finest materials for a long time and it feels super special to be able to sell them all in the shop. Because what good is a tutorial if you can't find any materials? And what good are materials if you don't know how to use them?
I wanted to start a new category right away with a nice tutorial! I will explain to you step by step how to make your stamps.

What do you need to make your own stamps?
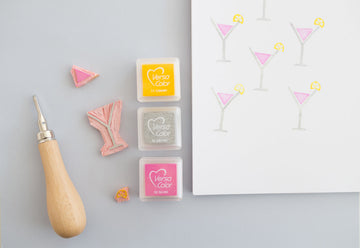
- A stamp gouge; I used the ABIG stamping gouge.
- Ink pads: I used VersaColor 1" in the colors 34 Orchid , 11 Canary , 92 Silver
- Carving blocks, I used Speedy Carve from Speedball.
- Paper, the stamps work best on light and matte paper.

How do you make your own stamps?
1. Shop your materials.
I have divided the materials for making stamps in the shop into 3 parts: Tools, stamp pads and the carving blocks. This way you can choose the materials you would like to use step by step.
2. Make a drawing on your carving block for your stamp.
Make a separate drawing for each color you want to stamp so that you can later stack them as layers. So I cut out the glass, the cocktail and the lemon separately.
Make sure you make this drawing as a mirror image. Otherwise your print will be a mirror image. Of course you can also easily start as I did: make a drawing where there is no mirror image.
3. Cut off the piece you need for your stamp.
You can do this with the knife that comes with your carving tools.
Sidenote : I did this carefully on the table for the nice white background. It is of course better to use a cutting mat underneath.
4. Now you can start cutting your stamp.
The gouge sets come with different types of gouges. With one gouge you can make sharper edges and cut deeper. You can try out which one works best for you, because all the gouges are already included in the sets.
Mama Judith here: Cut away from you and watch your hands. You may slip up. The gouges are really sharp and work like knives, so pay attention to your hands!
5. Stamp the ink onto your stamp with the ink pad.
Yep, that's the best order. Don't press too hard with your ink pad, so that the ink only gets to the right place. If you see that the ink is in the wrong place, you probably need to cut it away a little more.
6. Stamp it!
You stamp color on color. It takes a while for the ink to dry properly (5-15) minutes, so wait long enough with your next layer of ink.


 See, super easy! :) You can shop all the materials to make your own stamps here .
Do you have any questions after reading the tutorial? Or great tips for other readers: let them know in the comments below!
Happy making <3
Love,
Judith

